DeepCAD-RT tutorial
![]()
Content
- 1. Python source code
- 2. Jupyter notebook
- 3. Colab notebook
- 4. Matlab implementation for real-time processing
1. Python source code
UPDATE v0.7 (June 2022)
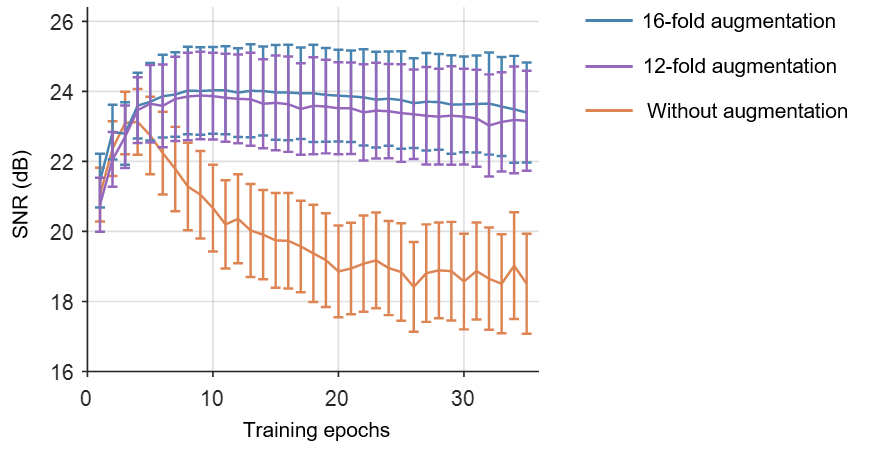
We replaced 12-fold data augmentation with 16-fold data augmentation for more stable results.
Denoising performance (SNR) with the increase of training epochs on simulatedc calcium imaging data:
1.1 Our environment
- Ubuntu 16.04
- Python 3.9
- Pytorch 1.8.0
- NVIDIA GPU (GeForce RTX 3090) + CUDA (11.1)
1.2 Environment configuration
-
Create a virtual environment and install PyTorch. In the 4th step, please select the correct Pytorch version that matches your CUDA version from https://pytorch.org/get-started/previous-versions/.
$ conda create -n deepcadrt python=3.9 $ conda activate deepcadrt $ pip install "numpy<2.0" $ pip install torch==1.8.0+cu111 torchvision==0.9.0+cu111 torchaudio==0.8.0 -f https://download.pytorch.org/whl/torch_stable.html -
We made a installable pip release of DeepCAD-RT [pypi]. You can install it by entering the following command:
$ pip install deepcad
1.3 Download the source code
$ git clone https://github.com/cabooster/DeepCAD-RT
$ cd DeepCAD-RT/DeepCAD_RT_pytorch/
1.4 Demos
To try out the Python code, please activate the deepcadrt environment first:
$ conda activate deepcadrt
$ cd DeepCAD-RT/DeepCAD_RT_pytorch/
Example training
To train a DeepCAD-RT model, we recommend starting with the demo script demo_train_pipeline.py. One demo dataset will be downloaded to the DeepCAD_RT_pytorch/datasets folder automatically. You can also download other data from the companion webpage or use your own data by changing the training parameter datasets_path.
python demo_train_pipeline.py
Example testing
To test the denoising performance with pre-trained models, you can run the demo script demo_test_pipeline.py . A demo dataset and its denoising model will be automatically downloaded to DeepCAD_RT_pytorch/datasets and DeepCAD_RT_pytorch/pth, respectively. You can change the dataset and the model by changing the parameters datasets_path and denoise_model.
python demo_test_pipeline.py
2. Jupyter notebook
We provide simple and user-friendly Jupyter notebooks to implement DeepCAD-RT. They are in the DeepCAD_RT_pytorch/notebooks folder. Before you launch the notebooks, please configure an environment following the instruction in Environment configuration . And then, you can launch the notebooks through the following commands:
$ conda activate deepcadrt
$ cd DeepCAD-RT/DeepCAD_RT_pytorch/notebooks
$ jupyter notebook

3. Colab notebook
We also provide a cloud-based notebook implemented with Google Colab. You can run DeepCAD-RT directly in your browser using a cloud GPU without configuring the environment. ![]()
Note: Colab notebook needs longer time to train and test because of the limited GPU performance offered by Colab.

4. Matlab implementation for real-time processing
To achieve real-time denoising, DeepCAD-RT was optimally deployed on GPU using TensorRT (Nvidia) for further acceleration and memory reduction. We also designed a sophisticated time schedule for multi-thread processing. Based on a two-photon microscope, real-time denoising has been achieved with our Matlab GUI of DeepCAD-RT (tested on a Windows desktop with Intel i9 CPU and 128 GB RAM).

4.1 Required environment
- Windows 10
- CUDA 11.0
- CUDNN 8.0.5
- Matlab 2018a (or newer version)
- Visual Studio 2017
4.2 File description
deepcad_trt.m: Matlab script that calls fast processing and tiff saving function programmed in C++
deepcad_trt_nosave.m: Matlab script that calls fast processing function programmed in C++ and save tiff in Matlab
realtime_core.m: Realtime simulation in Matlab & C++ and save tiff
DeepCAD-RT-v2.x.x/DeepCAD-RT-v2/deepcad/+deepcadSession: Real-time inference with data flow from ScanImage
DeepCAD-RT-v2.x.x/DeepCAD-RT-v2/results: Path to save result images
DeepCAD-RT-v2.x.x/DeepCAD-RT-v2/engine_file: Path for the engine file
4.3 Instructions for use
Install
-
Download the
.exefile from here. When you double click this self-extracting file, the relevant files of DeepCAD-RT will unzip to the location that you choose. -
Copy the
.dllfiles from<installpath>/DeepCAD-RT-v2.x.x/dllto your CUDA installation directory, for exampleC:\Program Files\NVIDIA GPU Computing Toolkit\CUDA\v11.0\bin. The CUDA installer should have already added the CUDA path to your system PATH (from TensorRT installation guide).
Model preparation
After training, the ONNX files will be saved in DeepCAD-RT/DeepCAD_RT_pytorch/onnx. In order to reduce latency, patch_t should be decreased. The recommended training patch size is 200x200x40 pixels.
We provide two pre-trained ONNX models in DeepCAD-RT-v2.x.x/DeepCAD-RT-v2 . The patch size of cal_mouse_mean_200_40_full.onnx and cal_mouse_mean_200_80_full.onnx are 200x200x40 pixels and 200x200x80 pixels, respectively. The calcium imaging data used for training these model were captured by our customized two-photon microscope.
Realtime inference with ScanImage

Matlab configuration:
-
Open Matlab.
-
Change file path to
<installpath>/DeepCAD-RT-v2.x.x/DeepCAD-RT-v2. -
Configure the environment:
mex -setup C++ installDeepCADRT -
Open ScanImage and DeepCAD_RT GUI:
scanimage DeepCAD_RT -
Set the parameters in GUI:
Model file: The path of the ONNX file. Click...to open the file browser and choose the file used for inference.Save path:The path to save denoised images. Click...to open the file browser and choose the pathFrames number: How many frames to acquire. It is equal to the value set in ScanImage. This parameter will update automatically when you clickConfigure.
Attention: You should set the frame number before clicking
Configure.Display setting:Manualmode: You can set the minimum and maximum intensity for image display.Automode: The contrast will be set automatically but slightly slower thanManualmode.Advanced: Advanced settings.Patch size (x,y,t): The three parameters depend on the patch size you set when you convert Pytorch model to ONNX model.Overlap factor: The overlap factor between two adjacent patches. The recommended number is between 0.125 and 0.4. Larger overlap factor means better performance but lower inference speed.Input batch size: The number of frames per batch. The recommended value is between 50 and 100. It should be larger than the patch size in t dimension.Overlap frames between batches: The number of overlapping slices between two adjacent batches. The recommended value is between 5 and 10. More overlapping frames lead to better performance but lower inference speed. -
After set all parameters, please click
Configure. If you clickConfigurefor the first time, the initialization program will execute automatically. -
You can click
GRABin ScanImage and start imaging. -
Before each imaging session, you should click
Configure.